
Jump to:
Straighteners are super common hair tools that most women own. While their intended use is for making wavy hair straight and smooth, they also work for curling hair if you have the right type of straightener.
The technique can take a little bit of practice to learn, but once you nail it, you’ll be straightening curls like a pro. Check it out below!
How to Curl Hair With a Straightener: A Summary

There are many different ways to curl your hair with a straightener, as well as several different types of curls you can achieve. Traditional curling irons typically let you go from straight to beachy waves to bold ringlets in a snap, but flat irons can make customizing your curls even easier.
We’ll teach you how to achieve your ideal wave by going through the motions in the sections to follow.
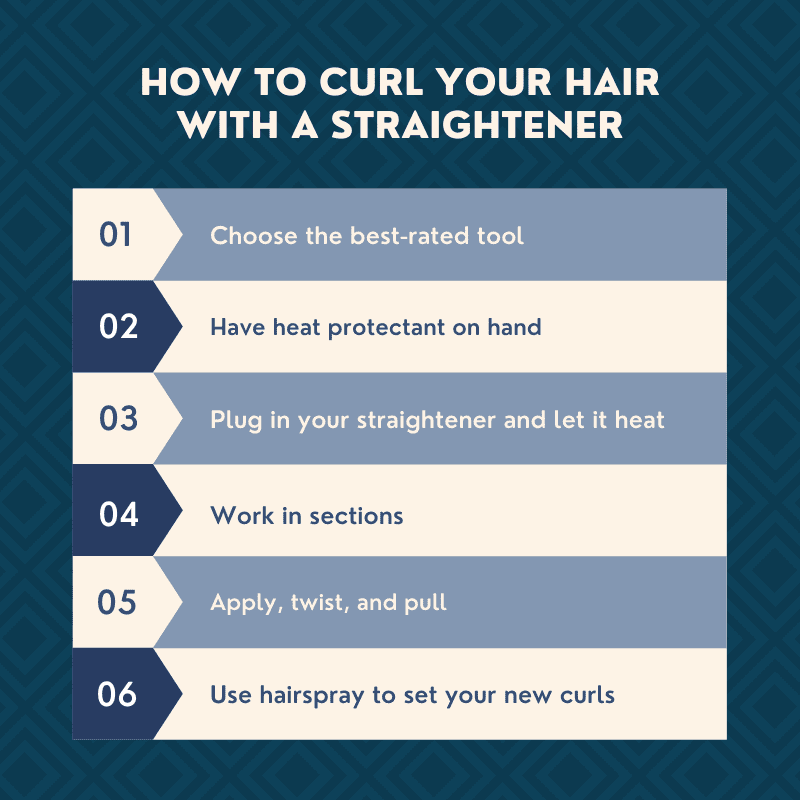
It only takes a few steps to successfully curl your hair with a straightener, and you can take a quick look at those steps below before we get into the details:
- Choose the best tool
- Have heat protectant on hand
- Plug in your straightener, and let it heat
- Work in sections
- Apply, twist, and pull
- Use hairspray to set
We’ll get into these steps a little more in the sections to follow.
How to Curl Hair With a Straightener in 6 Steps
Before we get started on how to curl hair with a straightener, let’s talk for a minute about heat protection. We’ll dive deeper into how to use it in our steps below, but it’s a critical component of hair care and the hair curling process.
When using heated products like flat irons and curling irons, your hair can suffer from immense heat damage. Signs of heat damage include:
- Split ends
- Breakage
- Dryness
- Rough texture
- Stringy appearance
- Frequent knots and tangles
Heat damage can make it difficult to style or grow your hair, and continuous, severe damage can even result in hair loss. While there are many ways to treat damaged hair, it’s much easier to prevent damage before it occurs.
Heat protectants are standard products used to do this.
Surface protectants help shield your hair from the extreme heat of products by sealing the hair cuticle with silicone or keratin. These ingredients can make your hair more resistant to damage.
Additionally, you should always avoid setting your heat tools to their max temperature. Just because they are capable of heating to 400 degrees doesn’t mean you need it that hot. You should always use the lowest heat setting that gives you the look you want. Since different hair types require different heat settings, you may have to play around a bit to find your ideal, lower heat setting.
A good way to test your flat iron is to use a piece of tissue paper. Set your flat iron to your desired temperature and let it heat fully. Spray your tissue paper with water, place it between the flat iron, and squeeze for 5 to 10 seconds.
If your tissue paper burns or you see smoke rise from it, your flat iron is too hot, and you need to turn it down. Your tissue paper should come out dry with no burn marks to indicate that it’s the right temperature. Similarly, if you hear hissing, crackling, or see excessive smoke coming from your hair (some steam is common), turn down the temperature.
Now that we have that issue covered, we can move onto our how-to guide.
1. Choose the Best Straightener for Curling
Let’s be clear: you do not have to go out and spend extra money on a brand-new straightener for curling if you already have a working one at home. Most straighteners will do just fine, so long as you use the proper technique.
There are a few features on flat irons that make the process a bit easier and more effective.
The first component to look at is the plates. For your best curls, look for ceramic plates. This material produces infrared heat, which is gentler and causes less heat damage. Nano titanium plates are also excellent, as they do an excellent job in drying hair faster, minimizing static, and reducing frizz.
Floating plates are also the best in terms of construction. Some straighteners only have one plate, so be sure to look for one with at least two (some have three!). Those with short hair will do best with smaller plates, while those with long hair should aim for larger plates. The shape of the plates also matters; look for plates that have rounded edges, as ones with blunt edges may cause lines or crimps in your hair.
Adjustable heat settings are an absolute must. Plus, just for practicality’s sake, we like a straightener that has a nice handle and a swiveling cord. All that movement can get you pretty tangled up.
A high-quality hair straightener will give you the best results and the most ease of use, so do your best to choose one that will get the job done well.
Read Next: How to Get Rid of Frizzy Hair
2. Condition and Protect
You probably already regularly condition your hair in the shower, which is an excellent start to healthy hair. But when you use heat tools, it’s a good idea to have a great leave-in conditioner on hand.
Leave-in conditioners, or no-rinse conditioners, get applied to towel-dried hair before you blow-dry or style. Their purpose is to moisturize your hair while also protecting it from damage. An added benefit is that it will help with detangling.
Once you find your favorite leave-in conditioner, you should apply it to damp hair before using any kind of heat – including your hairdryer.
If your hair is still damp, you should blow dry it. While many straighteners work on wet hair, you’ll find it super difficult to make any curls.
Even if you use a leave-in conditioner, you should still apply a heat protectant to your hair before curling. That process goes hand-in-hand with the curling steps.
3. Plug In Your Straightener
Most straighteners only take 30 to 60 seconds to heat up. So, realistically, you can do this step whenever you want. We recommend plugging your straightener in and setting the temperature before you start sectioning your hair.
By the time you finish sectioning, your straightener should be ready for use.
If you’re unsure what temperature to set your straightener on, try using the tissue paper test that we mentioned above.
If you don’t have tissue paper handy, you can test your straightener’s heat by using it. The best temperature setting for your flat iron is the one that allows you to straighten a small section with one single pass.
Start at the lowest setting and run it over a small section of hair. If it does not straighten your hair, you can adjust it higher until it does.
4. Section Your Hair
The next thing you want to do is section out your hair. This step will make the curling process much easier, as it will keep hair out of your way and let you work piece by piece.
If you have thick hair, you should start by gathering the top half of your hair and securing it high on your head with a large hair clip. Leave the bottom layer down and brush through it to loosen any knots.
As you curl the bottom section first, you will section as you go by pulling down 1- to 2-inch sections and clipping the rest separately. Once you curl your piece, you can unclip and take another piece until you’ve made your way through all of your hair.
5. Curl Your Hair
Now that you have your hair sectioned, take your heat protectant and spray it over the piece you’re about to curl. Your hair will be slightly damp from the spray.
Hold your straighter at a diagonal downward angle. Clamp it at the top of the strand close to your head and rotate it 180 degrees away from your face while you run it down the length of your hair.
While you complete these movements, you should see your hair begin to wrap around one side of your straightener. This is a good indicator that you’re doing it right.
If you complete the strand and find that the end of your hair didn’t curl completely, you can repeat this process, starting where your curl stopped.
Repeat this step for each new section of hair, and remember to spray each piece with a heat protectant before curling.
6. Tousle and Spray
Once you have curled your whole head of hair, use your fingers to break out and tousle your curls as desired. You can also touch up some curls that may have fallen or look out of place.
When you’re happy with your look, use your favorite hair setting spray and spray all over to hold your curls in place.
Things to Consider

puhhha/Shutterstock
Who doesn’t love an additional tip or two when it comes to styling hair? You’ll find just that below:
- If blow drying your hair first, be sure to keep the dryer 5 inches or more from your hair.
- Try sleeping with a satin pillowcase to keep your curls intact for longer.
- Limit your use of heat styling tools to once per week to avoid damage.
- Use a loose-hold hair spray for softer curls.
So, How Do You Curl Hair with a Straightener?
Curling your hair with a straightener is a skill that you can practice and refine over time. By clamping and twisting your straightener, you can create bouncy curls for a fun and feminine look. Just be sure to always protect your hair from heat damage!