
Jump to:
Ah, the 90s blowout. While you might remember this classic hairstyle from your younger days, it’s more popular now than ever before, thanks to TikTok. We’ll show you how to get this trendy style in our guide below.
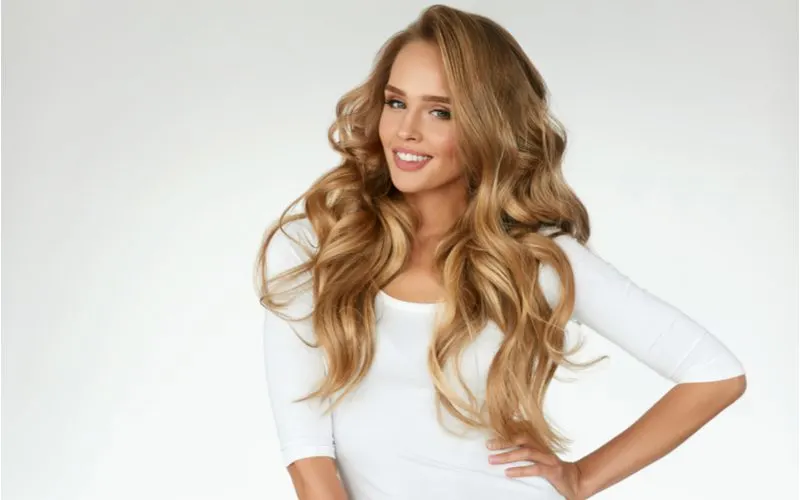
The 90s Blowout Is Trending. Here’s Why.


Focuslight/Shutterstock
The 90s blowout, with its sky-high volume, body, and luxe shine, is the trend we’re the *most* excited about right now.
Whether you rocked your fair share of blowouts in the 90s or you’re jumping on the bandwagon now, mastering this bouncy, put-together style will give you a new reason to get excited about doing your hair.
Blowouts are fun to do!
Once you nail the technique, you’ll find yourself turning to this versatile style for events from casual to formal. The 90s blowout is the current sought-after look.
Blowouts in the 1990s focused on creating lots of volume and height while keeping the hair softly curved at the ends for a sexy, tousled, but very put-together look. Who doesn’t want to channel their inner Cindy Crawford with a full blowout?
Mastering the classic 90s blowout requires a little patience, learning a few blow dryer techniques, and lots of practice. But once you’ve nailed the technique, you’ll be able to create voluminous blowouts that are full of body and make your hair look lush, thick, and healthy.
Read Next: What Is a Hair Blowout?
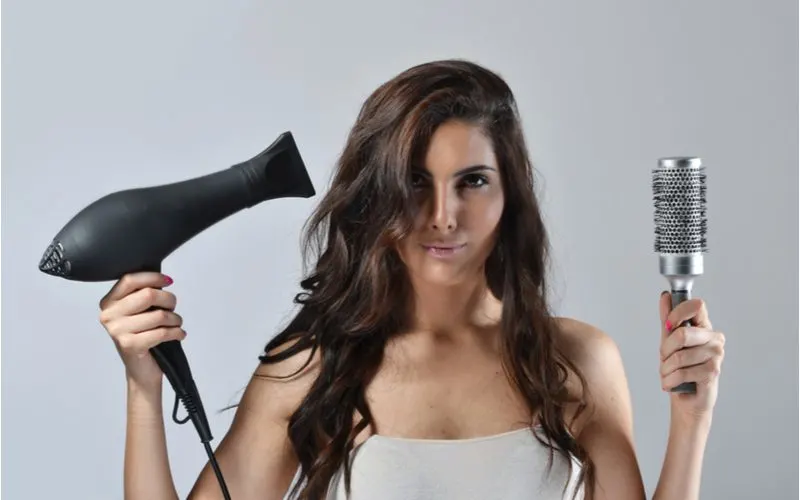
4 Keys to Creating a 90s Blowout

Puhhha/Shutterstock
Mastering a 90s blowout is all about product and technique. Before we get into the step-by-step instructions, let’s talk about the 4 factors that can make or break a blowout: Volume, texture, shine, and hold.
1. Volume
The first key to a gorgeous 90s-inspired blowout? Lots of healthy volume. Blowouts of the 90s focused on creating tons of volume by using specific products and blow-drying the hair up and away from the scalp for additional root height.
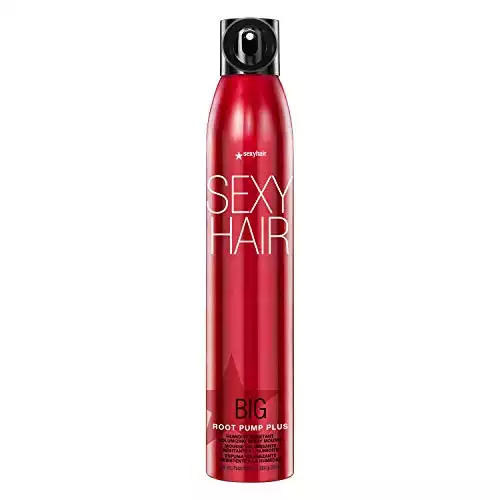
Looking for a good volumizing mousse to begin your blowout? Sexy Hair Big Root Pump Plus Volumizing Mousse is one of our top picks.
Spray the mousse through your roots and work it down through to the midshaft with your fingers for a major volume boost that will help you reach new heights – literally – with your blowout.
2. Shape
A great 90s-inspired blowout needs to have that characteristic shape: High-volume texture at the roots with shapely curving at the ends. You don’t want your blowout to be completely straight – that’s what a flat iron is for.
If you’re taking the time and effort to do a blowout, you want the shape and curvature at the ends that really defines this throwback style.
You can achieve this curved texture – not quite straight, not quite wavy or curly – with a good quality round brush (more difficult) or with the help of old-school velcro rollers (much easier).
The key is “molding” your hair around a cylindrical tool during the blow-dry process or while it’s still warm to create those polished curves at the ends.
3. Shine
Any blowout worth the effort has a healthy amount of shine. After all, no one wants a dull blowout! The dazzling effect of this voluminous, softly-textured style is boosted with a little extra shine. It gives the style a more polished and healthier look.
Shine starts with the overall health and hydration of your hair. Ensuring your hair is properly moisturized and nourished before your blowout will help a lot. You can take it a step further by using a shine-boosting product that will enhance the reflective qualities of your hair.
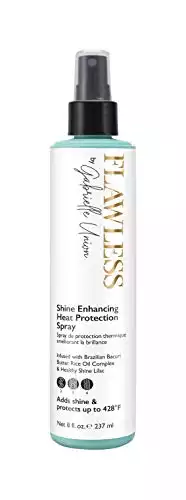
We like Flawless by Gabrielle Union Shine Enhancing Heat Protection Spray because it accomplishes two things at once.
You get healthy, prismatic shine that doesn’t look greasy plus robust heat protection to withstand the heat of the dryer during your blowout. Perfection!
4. Hold
The fourth and final key to nailing a 90s blowout is securing the finished look with a little touchable hold. You don’t want a crunchy, stiff blowout that’s been carefully molded into a static shape.
You want just enough hold to softly set the style – not so much that it prevents movement. Blowouts are all about movement and they should be dynamic with soft, touchable hold. That translates to light hold hairspray or setting spray for fine or thin hair.
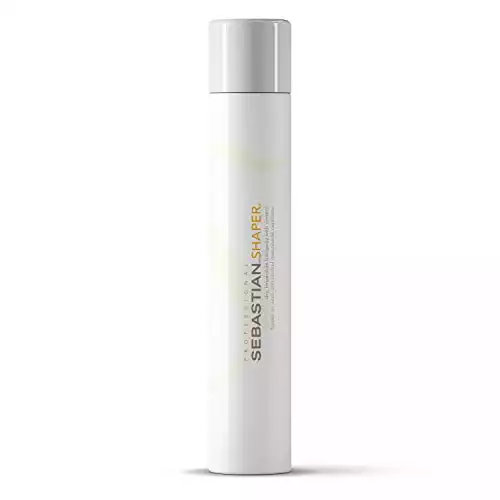
Thicker- and coarser-haired ladies should opt for medium hold hairspray that offers a little more hold and control. We like salon-quality Sebastian Shaper Hairspray, which comes in light, medium, and strong hold, for blowouts specifically.
Using a good hairspray to finish and set your blowout will help it keep its shape longer, prevent frizz and flyaways, and assist you in shaping and arranging the style to help it best flatter your face.
Build Your Blowout Toolkit

Studio 1901/Shutterstock
Creating a gorgeous, high-volume blowout straight outta the 90s starts with the right products and tools. Above, we linked some of our favorite products for blowouts.
There are a few more things to add to your toolkit to really master a great, voluminous blowout. Here’s what should be on your shopping list – or maybe you’ll luck out and have most of what you need in your bathroom closet!
- Blow dryer: Blow dryers range widely in quality and for a blowout, you need a good quality tool that won’t damage or overheat your hair. Look for a hair dryer with bonus features and settings that can assist you in creating a great blowout, like negative ion technology that prevents frizz or a lightweight ergonomic design that won’t prove too heavy to hold during a blowout sesh. If you can’t quite nail the round brush/dryer technique, consider a hair dryer brush that combines the 2 into one easy-to-use tool.
- Volumizing mousse: Volumizing mousse adds height at the roots and midshaft zone for flattering volume that raises the roots of your hair to prevent it from lying flat and limp – the enemies of a good blowout.
- Heat protection spray: You shouldn’t even attempt a blowout without some heat protection to prevent heat damage. We recommend grabbing a shine spray/heat protection spray combo that adds shine and luminosity while sealing strands with protection from heat up to 450 degrees.
- Round brush: If you’re not using a blow-dry brush, you’ll need a round brush to give strands that signature cylindrical, curved shape. The cylindrical brush shape molds the hair into a curved shape.
- Velcro rollers: For those who find the round brush/dryer combo difficult to use for a blowout, you can use velcro rollers in lieu of a round brush. Try drying with a paddle or basic hair brush and using velcro rollers to roll the warm hair up and mold it into the signature curved shape. Once cool, you can unroll the hair and reveal a perfectly set and shaped blowout.
- Hairspray: Every blowout should be finished with a fine mist of light or medium hold hairspray (depending on the texture and thickness of your strands). Fine or thin hair can get away with light hold hairspray – just enough to tame flyaways and set the style in place. Thicker or coarser strands need medium hold hairspray with a little more control and holding power.
- Hair clips: Doing your own blowout is much easier when you’re working with small sections at a time. Make sure you’ve got some hair clips on hand to keep the rest of your hair out of the way while you work on each section.
Once you’ve gathered the products and tools you need for a blowout, you’re ready to begin! Keep reading to get step-by-step instructions on creating a flawless 1990s blowout.
How to Create a Perfect 90s Blowout
Armed with the 4 keys to nailing a blowout – volume, shape, shine, and hold – and the right products and tools, you’re already halfway to creating the perfect 90s-inspired blowout.
Gather your products and tools and read through the steps below to get an idea of how the process works. When you’ve finished reading the instructions, start at step one and follow along!
Before you begin styling, make sure you’re starting with clean, damp hair. Lightly dab your hair with a towel to remove excess water after a shower and make blow drying a little easier. You can create an iconic 90s-inspired blowout by following 5 simple steps!
Step 1: Prep With Product
Brush through your hair gently to remove any tangles. Dispense a small amount of volumizing mousse into the palm of your hand and work it through your damp hair from root to midshaft.
If you’re using a root volumizing mousse, you can spray it directly onto your roots and work it in with your fingers.
Follow up with a mist of heat protectant spray – bonus points if it’s a shine enhancer and heat protection spray. This is key to preventing heat damage that leads to frizz, breakage, and dryness.
Step 2: Rough Blow Dry Upside Down
Start with a “rough” blow dry on the low heat setting – no need to use a brush for this part, you’re just removing excess water from your hair before you begin using the blowout technique. Bend over and position your head upside down while pointing the blow dryer downward.
Use your fingers to ruffle through your hair and allow the heat from the dryer to penetrate all layers. Once your hair feels like it’s about 60% to 70% dry, stand upright and brush through gently to remove any tangles formed.
This step will make the actual blowout much less time-consuming and reduce the amount of time spent holding a heavy dryer above your head. Trust us – it’s worth it to rough blow dry first!
Step 3: Section Hair and Begin Blowout
Using a few hair clips, twist and secure your loose hair into at least 4 sections (more if you have thick or coarse hair). Aim for two sections in the front and two in the back. Divide those into more sections if you want to work with smaller sections.
Unclip a section from the back to begin. It’s easier to knock the back out first, as it’s harder to reach and gets more difficult as your arm tires out during the blowout. Detangle the section gently with your hair brush.
If you’re using the classic round brush/dryer combo, nestle the brush close to the roots underneath the section you’re drying and slide it down to pull the section out and taut.
With the other hand, turn on the dryer and point the nozzle downward toward the pulled-taut section. Move the brush down the section slowly, turning the brush around in one direction to keep a tight hold on all strands as you keep the dryer pointed downward and blow air toward the ends.
When you reach the end of the section, twirl the brush to keep all strands securely wrapped and switch your dryer to the cool setting.
This blast of cool hair will set the curved shape created with the round brush. Repeat this step for each of the back sections. If you’re not using a round brush, you can use a regular or paddle brush to hold hair away from the scalp and keep it taut as you blow dry from above.
Once the section is fully dry, grab a velcro roller and roll the dried section up entirely. Secure with a clip and let it sit until the section has cooled completely. Repeat this step for each of the back sections.
Step 4: Focus on the Front
The front sections (2 or more, depending on the thickness of your hair) are the most important to style perfectly. Fortunately, the front sections are also the easiest to style! Focus on giving your blowout the shape and part that are most flattering for you during this step.
That might mean a middle part, an off-center part, or a deep side part. It’s all about what you think looks best! Unclip one of the front sections and detangle gently with a hair brush.
Front sections should always be blow-dried away from your face for the most flattering effect. You also want plenty of volume and height in the front to give the blowout a fuller look. “Up and out” should be your mantra for styling the front of your blowout.
If you’re using the classic round brush/dryer combo, nestle the bristles close to the roots of your unclipped section from the back. Twirl the brush in one direction and slowly pull upward to pull the section taut in the bristles.
Point your dryer at the section and dry as you continually twirl the brush away from your face and keep the section pulled tight. When you reach the ends, ensure they’re all securely nestled in the brush before switching to the cool setting. Repeat this process for the other front section(s).
If you’re not using a round brush, you can use a regular hair brush to help hold the front section up and out tightly as you blow dry it away from your face.
When the section is totally dry and still warm from the heat, roll it up away from your face with a velcro roller and secure with a clip. You’ll take all the rolled sections down in the next step. Repeat this process for the other front section(s).
Step 5: Finish and Set Your 90s Blowout
At this point, the back and front sections have been completely dried and molded into the signature curved shape we love so much in blowouts. If you’ve been using a round brush/dryer combo, the only step left is a quick mist of hairspray to set the style.
Mist it onto strands from an arm’s length away. This ensures you don’t weigh your fresh new blowout down with too much stiffness!
If you’ve been using velcro rollers instead of a round brush to create the blowout shape, you can now unroll each section to reveal your cooled-and-set voluminous blowout.
Smooth the sections a bit with your hands after unrolling and arrange the front in your preferred part. Mist with a little hairspray to set and hold the blowout.
Things to Consider
Master1305/Shutterstock
Now that you’ve got the 411 on creating the perfect 90s blowout, follow these additional tips to really make the most of this polished throwback hairstyle.
- For extra volume, dry sections in the opposite direction. Blow dry sections in the opposite direction you want them to lay for extra volume. For example, if you plan to wear a left side part, blow dry that front section over to the right. When you position the hair back over to the left, you’ll have a bump in root volume that looks oh-so flattering.
- Refresh a blowout fast. Want to rock your blowout a little longer, but it’s not looking as great? Mist a section with a little water to dampen it, then restyle with your dryer and round brush or velcro rollers. Many times, you’ll only need to restyle one or 2 sections to make your blowout look salon-fresh.
- Make your blowout last longer. If you want your blowout to last a few days, be careful with how you style your hair before bed. Pull it up into a high ponytail as close to your hairline as possible to avoid kinks and keep that fresh, sky-high volume alive overnight. Use a scrunchy, not an elastic, for the best results. You can always refresh the front sections with water and a quick touchup in the morning if needed!
- Experiment with different methods. Some women swear by velcro rollers, while others insist that nothing can create a gorgeous blowout like a good ol’ round brush. Some like a straighter, sleeker blowout while others live for the full, voluminous blowouts of the 90s. Be willing to experiment with different blowout techniques and methods to continue learning and ensure you’re not missing out on the best method for you.
- Invest in a great hair dryer. If blowouts are going to become a go-to style for you, it’s worth it to invest in a great – not good, but great – hair dryer. Our personal picks are the Drybar Buttercup and Dyson Supersonic. They’re more expensive than most, but they come with features that reduce heat damage and leave you with a frizz-free, shiny blowout every time. If you want salon quality results, start with a salon quality dryer.
Is the 90s Blowout Right for You?
The 90s blowout made have faded from popularity for a while, but it’s never been far from our thoughts. Whether you’re excited to rock this trend for the first time or see this trend as a welcome return to your favorite hairstyle of the 1990s, there’s no denying that a great blowout is a flattering hairstyle choice for most women.
Mastering the 90s-inspired blowout is easier than you think. Even if you’re a little overwhelmed at the prospect, practicing your blowout skills just once or twice will leave you much more confident in your abilities.
If you can, find a friend or family member to practice on – you may find it easier to get the hang of things by doing it on another person, and they’re definitely not going to turn down a free supermodel blowout. Look at you – making the world more beautiful one blowout at a time!