
Jump to:
Looking for a Dyson Airwrap review to learn whether or not it’s all it’s cracked up to be? So was I. So I bought one for myself. Read on to learn about my experience and whether it’s worth the big bucks.
My Honest Dyson Airwrap Review
Have you ever been intimidated by a hair tool? Until I sat staring at the Airwrap box, I hadn’t either. I think it was a combination of the crazy-expensive cost, the luxe/futuristic look of the Airwrap all the attachments, and just how different it is from any hair tool I’ve ever owned.
I was actually a little nervous about using it!
Honestly, I knew going in that using the Dyson Airwrap like a pro takes some practice. I’ve watched enough review videos to know it’s not always an easy tool to use.
So I read through the manual, got to know all of the attachments inside, and got familiar with the Airwrap tool before turning it on to use.
Keep reading to learn everything you need to know about this unique product- how it arrives, what comes with it, how the attachments work, different results you can get, and some tips and tricks I learned while using mine.
Whether you’re thinking about buying one, already own one, or think it’s the most ridiculously priced hair tool around and just want to learn more about it, I’ve got you covered with this review. Let’s start with the packaging and my first impressions.
Read Next: Does the Dyson Airwrap Damage Your Hair?
Dyson Airwrap Packaging
Packaging may or may not be important to you, but I figured it’s nice to know what to expect from the moment the Airwrap arrives on your doorstep. Here’s my experience with the Dyson Airwrap Complete packaging.
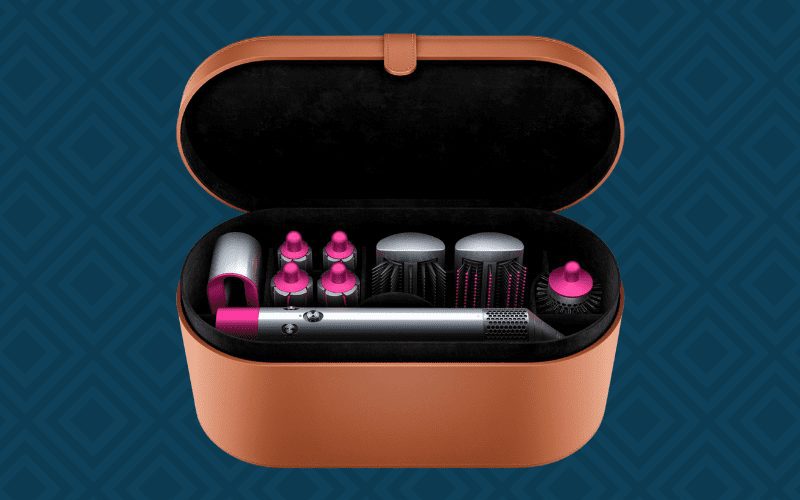
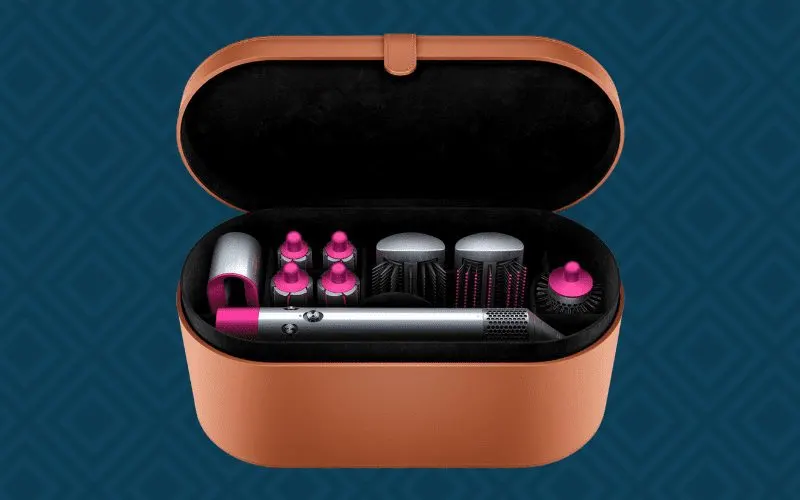
Everything came in a sturdy, reinforced shipping box. When I opened it up, the actual product box was securely nestled inside. And inside of that box, I found this gorgeous vegan leather storage case with everything neatly stowed away in its own little compartment inside.
There’s a nice magnetic closure on the case, which I found easy to use but not super-secure (it would pop right open if the case was upside down). It has a velvet-like lining inside along with inserts you can pull out to access additional compartments. That was a nice touch.
It comes with a vegan leather non-slip mat that protects your countertops and surfaces while using the Airwrap. The non-slip mat matches the case so everything has a really cohesive look.
There was a perfect little space for each attachment and the Airwrap itself inside the case. It had plenty of room for the cord inside a hidden compartment under the Airwrap. I liked that because the cord is pretty thick and long – I would hate to kink and twist it to jam it into a smaller case.
I was overall impressed at the secure packaging and how functional and luxe the storage case was. But in the back of my mind, I was still thinking about the price. I mean, it better be in a nice case for almost $600!
With that said, I was more interested in how the Airwrap and attachments worked on my hair. So, let’s dig in!
Getting Started
TBH, the Dyson Airwrap instruction manual wasn’t super helpful. I was surprised at how basic the instructions were. There were no real instructions on how to use the different attachments or techniques to get different looks – just how to operate the styler and change attachments.
I didn’t see any styling tips, and those really would have helped me.
Luckily, I watched a few Airwrap review videos while I was waiting for mine to arrive and had seen some of the attachments in action. It still made the learning curve that much more steep not having clear instructions on how to use each attachment. Dyson should definitely remedy this with a better instruction manual!
Prepping My Hair
Before I tell you all about my experience with the Dyson Airwrap, you should know a little bit about my hair:
- Mid-back length
- Type 2A (slightly wavy, tends to frizz)
- Medium texture (not fine or coarse)
- Thick density
To prep for using the Airwrap, I needed to make sure my hair was damp. I took a shower and towel-dried my hair gently until it was damp. This is simultaneously the best and the most annoying thing about the Airwrap to me.
On one hand, I can take a shower, get out and use the Airwrap immediately to achieve beautiful waves, curls, sleek hair, or a blowout in 15-20 minutes instead of 45 minutes to an hour. I can even style my hair straight from the pool (and since I brought my Airwrap on vacation with me, I definitely did).
That’s amazing.
If you’re the type who tends to run late or wants to shorten your styling time, this is one of those things that just might make the Dyson Airwrap worth it. You go from shower to styled so much faster than with a dryer and separate hot tools.
On the other hand, trial and error with the Airwrap has shown me that yes, your hair really does have to be damp to use this tool. Every other hot tool I’ve ever used (with the exception of the Wet2Straight flat iron) has required my hair to be completely dry.
So just getting used to the fact that your hair must be damp to use this is strange.
Using a spray bottle to make my hair damp didn’t work very well for me, maybe because my hair is thick. At one point I used the spray bottle method to dampen my hair before using the 1.6” barrels. The loose waves fell out within an hour because my hair just didn’t get damp enough.
So in my towel-dried, slightly damp hair, I used a couple pumps of The Doux Mousse Def Texture Foam to help give my hair some volume and shine. Then I brushed through to remove any tangles before starting with the first attachment. Here’s my experience with the different attachments.
Dyson Airwrap Attachments

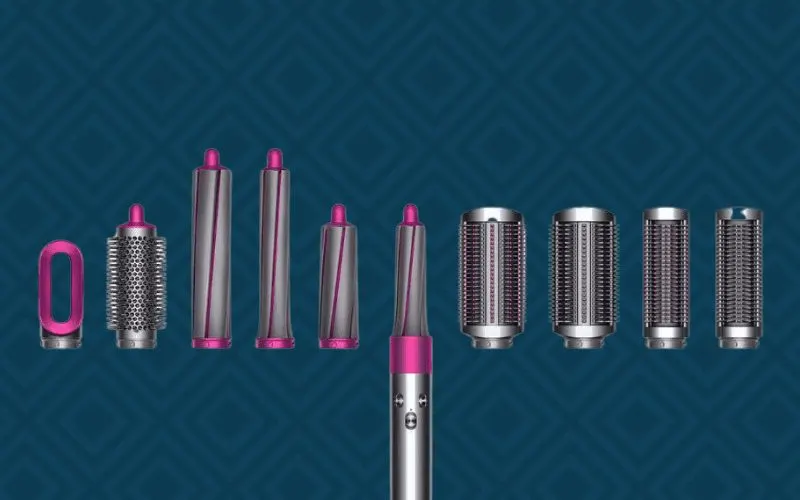
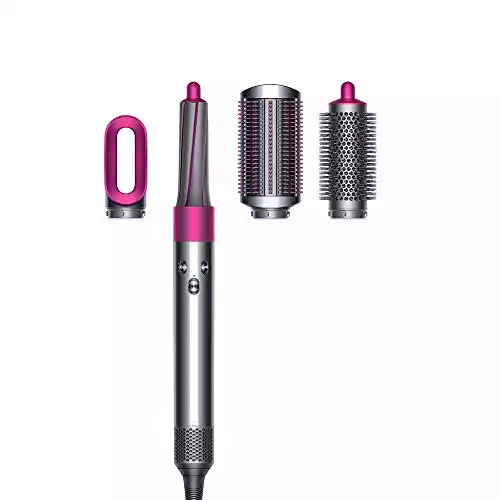
I got the Dyson Airwrap Styler Complete set which came with the Airwrap styler and 6 different attachments:
- Pre-styling dryer
- Soft smoothing brush
- Firm smoothing brush
- 1.2” Airwrap barrels
- 1.6” Airwrap barrels
- Round volumizing brush
The variety of attachments and the ability to switch them out to create different looks and textures was one of the big reasons the Airwrap appealed to me. So I had high hopes for each one.
I knew that after a few uses I was bound to develop some favorites and I definitely did. Here’s my take on the attachments.
Pre-Styling Dryer
I also have the Dyson Supersonic Hair Dryer, so I can’t help but mentally compare the pre-styler dryer attachment to it. They both have the same quiet, powerful digital V9 motor and Dyson’s low-heat drying technology.
The Supersonic does have higher wattage (it’s 1600W), so it offers more powerful airflow settings and higher heat settings than this Airwrap dryer attachment.
In my Dyson Supersonic review (linked above) I mentioned that the Supersonic dries my thick hair in about 11 minutes, less if I don’t brush and section it out. The pre-styling dryer got my hair to the 50% dry/still damp point in about 5 minutes.
It was pretty simple to learn how to use the pre-styling dryer attachment. I love how futuristic and high-tech this attachment looks. I angled it down and targeted my roots since the midshaft and ends were going to be dried with one of the other attachments.
While this attachment isn’t quite as great as the Supersonic dryer, it’s definitely a powerful tool.
It takes about the same amount of time to dry my hair. But since you can’t use Airwrap attachments on fully dried hair, it seems like a waste to even use the pre-styling dryer unless you’re in a hurry.
I found that as I got more comfortable using the Airwrap, I skipped the pre-styling dryer entirely in favor of a quick towel dry and letting my hair air dry for about 10 minutes.
Soft Smoothing Brush
The soft smoothing brush attachment can be used to create a blow-dry finish that is smooth and sleek. It has nylon ball tipped bristles to be extra gentle on your hair and scalp.
I noticed the rows of bristles kind of rock back and forth on little plastic platforms. This seemed to help keep my hair taut and smooth while I used it. I had a feeling that this was going to be my favorite attachment (and it is).
Using the soft smoothing brush was really easy. Once I locked it into the Airwrap, I turned it on and tossed my head upside down to get some extra volume. Starting at the roots, I slowly glided the brush down to the tips. It took about 3 passes over each section to achieve 100% dry hair.
I only had two complaints:
- It did give me a smooth, sleek style, but I still had some frizz and flyaways when using this attachment on high heat and high airflow. You might have different results depending on your hair type (I’m 2A with a slight wave), or if you use a lower airflow setting.
- It can be a little awkward to hold and use because the Airwrap handle is so long. I have other one-step stylers that aren’t as long, but they also don’t work as well and take longer to style my hair.
Even with these issues in mind, I was overall impressed and really pleased with this attachment. In fact, it’s now my go-to Airwrap attachment. I find that it’s one of the fastest and most user-friendly attachments.
Firm Smoothing Brush
The firm smoothing brush attachment is supposed to help calm frizz and flyaways, especially on coarse or curly hair that is hard to brush through for a blowout. I thought this might be the best attachment for me since the soft smoothing brush left me with some frizz and flyaways.
However, I found that this attachment wasn’t a great fit for my hair type (medium texture, slight wave). It wasn’t as comfortable to use because the bristles are hard and not ball-tipped.
And it didn’t eliminate frizz or flyaways in my hair – just gave me a less smooth, less sleek version of the results I got with the soft smoothing brush.
If you struggle to brush through your hair or have trouble straightening it, then the firm smoothing brush is probably just what you need.
It’s strong enough to pull the coarsest hair taut for a smooth finish. But for me, it seemed like a less-gentle version of the soft smoothing brush. This is one of the attachments I just don’t see myself using again.
Airwrap Barrels
With the Airwrap Complete set, you get two 1.2” barrels that create big, bouncy ringlets and spiral curls. You also get two larger 1.6” barrels that create looser curls and waves. The Airwrap barrels were the most intimidating attachments to me and I did find them more challenging to use.
The fact that there were two of each barrel confused me at first. Then I realized there’s one for clockwise and one for counter-clockwise curls. This way you don’t have all your waves or curls pointing the same direction.
Dyson had to do this because the shape of the slits on the Airwrap barrels along with the airflow is what creates the direction of the curl. So you can’t use the same barrel to do both sides of your head or all the curls will go in the same direction.
I had to turn the styler off, release the clockwise barrel attachment with the lock button, and lock the counter-clockwise barrel in to do the other side of my head. It only took a few seconds, but I still thought it was inconvenient.
Now, the cool part: The Airwrap uses the Coanda effect to pull hair close to the attachments so it can be dried and styled smoothly. So when you hold the Airwrap barrel close to a section of your hair, the airflow just pulls your hair to and around the barrel like a magnet.
Then you use the cool shot button to set each curl before releasing it. It’s pretty amazing. But I couldn’t quite nail the process. My hair is thick and long and I didn’t get the long barrels (sold separately).
So I had to take very, very small sections of hair – like 1” sections – in order to allow the entire section to wrap around the barrel. I also had trouble getting the Airwrap to reliably wrap my hair around the barrel. I had to unwrap the hair multiple times and try a new angle of approach to get it to “take” my hair and wrap it.
Frustrating!
It took forever doing such tiny sections and having to try multiple times to curl each one. I didn’t even finish my entire head. Plus, using the cool shot button for a few seconds on each section made it take longer.
I estimate it would take about 45 minutes to finish my style, and that’s not any faster than I could do it with a blow dryer and curling iron.
Compared to using a traditional curling iron, switching barrels out to change the direction of curls with the Airwrap was more work and not intuitive at all. When I use my curling iron, I can seamlessly move from one side of my head to the other by just changing the direction I curl in.
But with the advantage of being able to take my hair directly from the shower to loose waves or defined curls with these barrels, it helps make up for the inconvenience of switching out barrels and the difficulty of wrapping the hair.
The curls also had amazing staying power – my springy, voluminous test curls I did with the 1.2” barrels lasted 2 days without a touch up. My looser waves (done with the 1.6” barrels) lasted all day without falling flat.
Making sure your hair is really damp first is important. When I tried to dampen my hair with a spray bottle, it didn’t get wet enough and my 1.6” barrel waves fell out quickly. So keep that in mind!
Round Volumizing Brush
The round volumizing brush is supposed to be perfect for those voluminous blowouts that have tons of movement and lots of body.
I kind of dreaded using the round brush attachment because I’ve never been great at doing blowouts with a round brush – my hair always ends up in tangle city. So I tried to keep an open mind but didn’t expect great things from this attachment.
I had to section my hair for this attachment, pulling the top half up and starting on the bottom half. I brushed upward from underneath my hair, moving the brush slowly down the section to dry it fully.
Then, I wrapped each section around the brush and used the cool shot button to set the style. This gave me lots of body and volume without creating actual curls.
One thing that really surprised me is that the Coanda effect the Airwrap uses did make it easier to use the round brush. It seemed like it better pulled my hair to the barrel and was less likely to get tangled in my hair than a traditional round brush.
But the airflow that comes out of the brush also caused all my baby hairs jut out and flyaways to take flight. So while my ends looked great, I had a lot of frizz and flyaways at the roots and midshaft area.
I will use the round brush attachment when I want a big, voluminous blowout. And I’ll probably use some Frizz Ease next time.
Dyson Airwrap Tips and Tricks
I’ve learned a thing or two about the Airwrap and figured I’d share my best tips and tricks. These can help you get the most out of your Airwrap!
1. Make Sure Your Hair Is Actually Damp
Dyson recommends using the Airwrap on hair that is 80% dry, but I found that leaving my hair a little more damp than that gave me the best, longest-lasting results. I don’t even use the pre-styling dryer unless I’m in a rush.
And don’t even bother trying to use the Airwrap on dry hair.
Curls and waves won’t hold and it can’t straighten wavy/curly hair if it’s already dry. And if you’re planning on spraying your hair with a spray bottle to dampen it, section it off to ensure every section gets sprayed. Any areas left dry won’t hold their style.
2. Use the Cool Shot Button for Lasting Curls, Waves, and Blowouts
I experimented to see if it really is necessary to use the cool shot button on every section as Dyson recommends. After all, it makes the process a lot longer and adds an additional step to every style.
What I found out: You can use the Airwrap without the cool shot button, but your results likely won’t last.
My curls were beautiful for about an hour before falling flat when I didn’t use the cool shot button with the curling barrels. They lasted well into the next day when I did use the cool shot button.
Some of the negative Airwrap reviews I’ve seen complain about the styles not lasting long enough and I really think not using the cool shot button to properly cool each curl/wave/section is the reason. You really do have to cool each section down after styling to set the style.
3. Use a Good Styling Product First
When I read reviews from people who absolutely hated the Airwrap or couldn’t get good results from it, I believe they’re either using the wrong styling product or not using one at all. This is a great hair tool, but it’s not a miracle worker.
It won’t solve all your hair woes on its own.
I get good results when I use the Airwrap without any product, but I get *amazing* results when I work a good mousse through my frizz-prone, wavy hair first.
Your results will be even better if you use the right products in the shower – like a good straightening shampoo if you’re planning on using the smoothing brush. If you’re struggling with frizz when you use the Airwrap (due to the wind tunnel effect), try a different styling product and see if it helps.
It’s all about your hair type and attachment you’re going to use. So choose a product that is suitable for your hair type and the look you’re creating.
That might be smoothing serums for straight hair using the smoothing brushes, volumizing/texturizing mousses for blowouts with the round brush attachment, or wave sprays and curl creams for more textured styles with the Airwrap barrels.
4. Smaller Sections Give Better Results
My hair is long and thick, so the smaller sections I used, the better my results were (especially with the Airwrap barrels). I’m aware there are longer barrels available just for this purpose.
But I learned the hard way that taking big sections of long, thick hair just doesn’t work with the Airwrap. The wind tunnel it creates with the curling barrels will only attract so much hair to the barrel at a time.
And the relatively short length of the barrel means there’s just not much room for the hair to spiral around before it’s coming off the top.
I also found that taking smaller sections when using the smoothing brush and round brush attachments cut my styling time because it dried each section faster. When I took larger sections in an effort to speed up the process, it took longer. So take little sections to get the best results.
5. Use the Airwrap for Next-Day Touch Ups
While your hair needs to be damp to use the Airwrap to style it, I found out that it works great on dry hair (or slightly damp – lightly sprayed with a spray bottle) as a touch-up tool. I’ve tried both the Airwrap barrels and the smoothing brushes the next day on dry hair with great results.
Just make sure you’re re-curling the same sections if you use the barrels on dry hair – they’re not actually curling your hair this time around, just reshaping it back into the curl.
What I do is re-curl the section with heat the next day, then hit it with the cool shot button for a few seconds before releasing. To touch up next-day straight hair, I just turn up the heat setting and run the smoothing brush throughout my hair to keep it sleek.
If I have any frizzy sections or kinks in my hair from sleeping, I can spray a little water onto the top layer of my hair and run the soft smoothing brush over it to re-straighten my hair. It works perfectly!
Dyson Airwrap Pros: What I Loved
Let’s talk about the things I really loved about the Airwrap. And there are quite a few!
- Go from shower to styled in minutes: Nothing has ever dried and styled my hair as quickly as the Airwrap (especially with the soft and firm smoothing brush attachments). I no longer dread dealing with my hair after I shower. That’s a big deal for me. And I can be out the door so much faster than air drying or blow drying and using a separate hot tool.
- Multiple looks from one tool: As a woman with a closet full of various hair tools, this is the only one I could see truly replacing them all. I can get sleek, wavy, curly, or salon-quality blowout looks from the Airwrap.
- Less damaging on hair: The much-lower heat exposure from the Airwrap makes it less damaging on hair than other hot tools. It never gets above 302 degrees Fahrenheit. So over time, using a tool like the Airwrap can result in healthier hair with less breakage and more shine and strength.
- Perfect for traveling: Who wants to bother bringing a hair dryer, flat iron, curling iron, and multiple brushes on a trip? With the Airwrap Complete set, you just pack it all into the pretty storage case and you’re good to go.
- Serious style staying power: I’ve found that my Airwrap curls last about 2 days, looser waves last all day, and straight/blowout styles can last for as long as 3 days with quick touch ups. Something about the gentle heat and setting with cool air gives me amazing style staying power.
- Lots of shine and volume: Every Airwrap attachment I used left me with shiny, voluminous hair. Even the attachments that left me with some frizz still gave me shine and volume as a tradeoff.
Dyson Airwrap Cons: What I Hated
This is a hair tool that costs nearly $600, so yeah – we’re gonna talk about the things I didn’t like. Unfortunately, there were a few things that I just didn’t dig about the Airwrap.
- It’s ridiculously expensive: If you get the Airwrap Complete set, you’re looking at a $549.99 purchase. Yes, it comes with lots of attachments and a fancy carrying case. But it is almost $600. For a hair tool. It’s kind of hard to stomach for a budget-conscious woman like me.
- The learning curve for curls is steep: Using the smoothing brushes, round brush, and pre-styling dryer was pretty simple and easy to get the hang of. The Airwrap curl and wave barrels, however, are really difficult to use properly and, frankly, I still feel I need lessons after using them 4-5 times.
- Six attachments may be overkill: I tend to use the soft smoothing brush and the round brush attachments about 90% of the time. If you don’t think you’ll use all 6 attachments in the Complete set regularly, you’re paying $550 for a lot of unnecessary extras.
- Switching barrels for different curl directions is inconvenient: For such an expensive tool, it’s inconvenient to have to switch out barrels to get counter-clockwise curls. You don’t have to do that with cheaper curling irons! This would be really inconvenient if you like to do multi-directional waves and curls for a more natural look.
- Awkward handling: Some of the attachments felt awkward to use on such a long handle, like the smoothing brushes and round brush. I’m used to handles being much shorter on brushes so this took some getting used to.
- Giant cord: The long cord is great for maneuvering around while you style, but terrible for storage and kind of unwieldy during use. The plastic box near the end of the cord also continually smacks against the wall while I use the Airwrap. That’s annoying.
So, Is the Airwrap Worth It?


Roman Samborskyi/Shutterstock
You’ve seen my complete and honest review of the Airwrap styler, all the attachments, and the little tips and tricks I’ve learned along the way. So is the Airwrap worth it or an overpriced status symbol?
The Airwrap is easily the best hair tool I’ve ever used. And honestly, for the price, it should be.
I love the variation of styles I can get from it and I like that I can dry and style my hair with one tool right out of the shower. This is a tool I will bring on every vacation and trip I take. It seems like it’s made for traveling — everything fits in the beautiful storage case and you have lots of different styling options from this one tool.
But the price. The price! I can’t get past it.
If the Airwrap was a little less expensive – maybe $400 instead of nearly $600 – I’d feel better about recommending it to others. But the sheer cost of this tool makes it unrealistic for most people. And even though I love the results I get with it, I just don’t believe it’s worth the price.
If cost isn’t a concern to you, you definitely need this tool. There’s a reason it’s made such a splash in the beauty industry.
But if you’re on a budget, I believe you can get similar – not as great, but similar – results from the Revlon One-Step Hair Dryer and Volumizer for much less.
I hope my review has been helpful for you! Now if you’ll excuse me, I’ve still got a lot of practicing to do. These curls aren’t going to wrap themselves…oh, wait. Yes they are!