
Jump to:
Seeing roots appear as your highlights grow out is embarrassing, especially if you have a special event coming up. So, if you don’t have the time or money to get a new set of highlights, using the root bump technique is a wonderful way to freshen up your color.
What Is Root Bump?

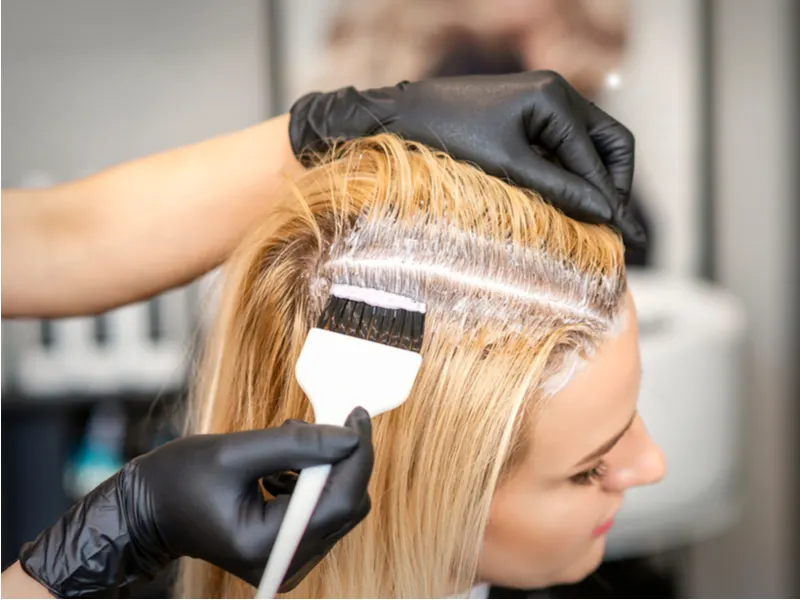
Michelle Aleksa/Shutterstock
A root bump is a faster and cheaper way to lighten roots as highlights grow out than re-highlighting your hair.
In this article, we’ll explain the root bump in detail, including:
- How it works
- Advantages and disadvantages
- How to do a root bump at home
- Tips before embarking on it
Root bump is a great option for many people, but some people might find its upkeep overwhelming. Read on to discover whether this technique is a good fit for you.
Read Next: How to Bleach Your Roots
Understanding How Root Bumps Work
Root bump is a way for people who consistently get highlights to cover their darker roots as they grow in without you having to go through the expensive and lengthy process of re-highlighting your hair.
Root Bumps vs. Root Smudges
It’s easy to confuse the terms root bump and root smudge, especially since the process for applying them is the same. The difference is that root bump uses a lighter base color on your roots and highlights. In contrast, root smudges use a darker base color.
Benefits of Root Bumps
There are many reasons why people opt for root bumps instead of re-highlighting their hair. Some of the biggest benefits include:
- Save money
- Brighten your hair color
- Reduce time spent at the salon
- You don’t have to make a special appointment
- Healthier hair since it uses less bleach
That’s right—by getting a root bump, you won’t have to invest half of your precious day off at the hair salon. Plus, you’ll get to enjoy a brighter, fresher highlighted look while spending less money than you would on a new set of highlights.
While you should always tell your salon what you want them to do to your hair so they can allot sufficient time for it when you go to make your appointment, the good news is that you can get a root bump done with any type of hair appointment.
Your hairstylist can quickly apply a root bump, whether you want a simple hair cut, blowout, or conditioning treatment. Root bumps are also healthier for your hair than highlights, given that they don’t force you to place bleach on top of your already bleached hair.
As a result, your hair will remain stronger and less prone to breakage. In fact, studies show that not only does hair undergo damage from bleaching, but your scalp does too. Some people even develop painful scalp burns as the result of excessive bleach use.
Read Next: Does Bleaching Your Hair Damage It Forever?
Disadvantages of Root Bumps
Despite the many advantages of applying a root bump, you need to be aware of a couple of potential red flags. Some of the downsides to using the root bump technique include:
- Harsher line forms when it grows out
- You’ll need to visit the salon more frequently
So, although a single root bump session will save you time and money compared to highlights, it requires more upkeep because of that harsh line that’ll appear as your hair grows.
Therefore, it might be worth using root bumps as a fast and easy touch-up method when you have a big event, like a wedding, coming up. However, it might not be a technique that you’ll want to use on a regular basis.
How to Do a Root Bump at Home
If a root bump sounds just like what you’ve been needing to keep your highlights looking their best, but you don’t want to take a trip to the salon, you can do a root bump yourself by following the steps below.
1. Gather Your Materials
Doing a root bump at home isn’t expensive. However, you’ll need the following materials before beginning.
- Hair color
- 20 volume developer
- Mixing bowl and brush
- Gloves
- Towel
Choosing the right hair color is crucial to achieving a smooth-looking root bump. So, if you’re unsure about which color is best for your highlights, consult with your hairstylist.
2. Prepare Your Hair
It’s crucial to use the root bump technique on clean, damp hair. So, hop in the shower, shampoo your hair, rinse it, and towel it dry. Once you do that, take a separate, dry towel that you don’t care about and wrap it around your neck and shoulders.
That way, you’ll protect your clothes from potential stains. Should you stain your clothes with hair dye, the University of Illinois runs through aggressive steps you can take to try to remove it.
Finally, comb your hair to get out any knots. Doing so will ensure you achieve an even root bump application without taking precious time to undo knots while the dye sets.
3. Prepare the Dye
We recommend using a 1:1 ratio of hair color and volume developer. So, toss on your gloves, squeeze the dye and developer into your mixing bowl, and use the brush to stir them together.
Read Next: How to Mix Bleach and Developer
4. Apply the Dye to Your Hair
Using a combination of the brush and your fingers, work the dye and volume mixture into your roots and hair. You’ll need to section your hair to ensure you don’t leave any roots unturned.
5. Wait for Desired Color
We’ve arrived at the most challenging step, given that you’ll need to use your best judgment about how long to leave the dye in your hair. If you don’t leave it in long enough, your roots will still be quite dark.
However, this is better than the alternative, which is leaving the dye in so long that your hair takes on an orange-ish hue. Usually, 6 – 10 minutes is all you’ll need to achieve a root bump look.
6. Rinse and Condition
As soon as you decide that you’ve left the dye in long enough, jump into the shower and rinse it out. Then, apply a high-quality conditioner to your hair. You can now dry your hair and check out a (hopefully!) job well done.
A Reminder About Applying a Root Bump
While doing a root bump at home will save you time and money, the safest option is to get it done at your salon. There’s a lot that can go wrong with trying a DIY root bump if you don’t have experience dying your hair in the past. So, if you have any hesitations, we recommend leaving root bump applications to the experts.
Tips for a Beautiful Root Bump


Melena-Nsk/Shutterstock
Learning about the benefits and possibility of a root bump is exciting, especially if you’re on a budget or hate dedicating your Saturdays to sitting in a salon chair. However, before you embark on this journey, read through the tips below to maximize your root bump success.
Know Your Highlights
Highlights come in several varieties. Furthermore, what you believe to be highlights could be a different style of hair technique that creates a similar effect. So, before you do a root bump, check with your salon to ensure it’s a good option for your hairstyle.
Furthermore, remember that there’s a difference between root bump and root smudge. So, if darkening your roots is what you need instead of lightening them, you’ll want to ask your salon for a root smudge, not a root bump.
Practice Speed
Should you decide to perform a root bump at home, practice how you’ll put it on your dry hair before applying the dye. That’s because the moment the dye touches your roots, it’ll start working its magic.
So, given that leaving this dye on your hair for any time over ten minutes could lead to a root bump that’s too light, it’s crucial to work it through your hair quickly before rinsing it off.
Choose the Right Lifting Level
When performing a root bump, you should never lift more than two levels of hair color. Otherwise, your hair will look too light, causing it to clash with your highlights. Lifting levels can feel like confusing lingo if you haven’t worked with them before.
And it’s even more challenging if you don’t know your hair’s current level. So, to avoid the possibility of a root bump disaster, get advice about lifting levels from your hair salon before attempting to do a root bump at home.
Use Purple or Blue Shampoo
Putting your hair on a purple or blue shampoo schedule is crucial for helping your highlights and root bumps stay bright and last longer. That’s because these shampoos are toners that neutralize brassy colors.
Deciding whether your hair needs purple or blue shampoo comes down to the color wheel. Brunettes and people with darker hair often have warm orange or red tones.
If you look at the color wheel, the color opposite these colors is blue. Similarly, blonds have warm yellow tones. So, the color opposite of yellow on the color wheel is purple, meaning that purple shampoo is best for them.
Frequently Asked Questions


Olena Yakobchuk/Shutterstock
If you still have questions about root bumps, we’ve compiled our answers to some of the most common questions.
What does a root bump do?
A root bump lightens your roots and highlights in between highlight sessions. It’s a faster and more economical option that highlights, and you can do it at home or in a salon.
How long does a root bump take?
Root bumps can take under 30 minutes. To do a root bump, you’ll need to shampoo your hair, apply dye and volume developer for up to around ten minutes, and rinse and condition.
Can toner lighten my roots?
Toner can help brighten your roots, but it’s not as effective for lightening as root bump. It works by neutralizing colors, helping to give your hair and roots a more even, brighter appearance.
What does it mean when your roots grow out?
Your roots growing out is the process of your highlighted or dyed hair growing without you applying color to the new hair growth at the base of your head. Using the root bump method is an excellent option for covering darker roots.
How long should you wait to retouch roots?
You should retouch your roots every 4-6 weeks. If you have highlights, using the root bump technique is an excellent way to extend this time even longer, given that it’ll simultaneously cover darker roots and help brighten highlights.
So, What Is Root Bump?
A root bump is an excellent way to reduce how often you need to get highlights. It’s a faster and cheaper method, although you may need to make more frequent trips to the salon to maintain it. If you’re still interested in root bumps, we encourage you to speak with your hairstylist to get started.